Network BGP团体(Community)属性

为何团体属性

团队属性也是BGP路由属性的一种,利用团队属性可以将路由策略应用于一组路由。大家可以回忆一下,我们用LP、MED、AS_PATH属性来解决BGP路由的各种问题的时候,无一例外都要用到路由策略,而路由策略很多都是基于前缀来进行处理的。当需要处理路由特别多的时候,我们的配置和维护工作量就会大幅度增加,在大型网络中,这种配置和维护的成本是难以接受的。所以我们可以对需要做同一策略的路由标识一个相同的团队属性,这样就可以基于团队属性来对路由实施策略了。

团队属性也是BGP路由属性的一种,利用团队属性可以将路由策略应用于一组路由。大家可以回忆一下,我们用LP、MED、AS_PATH属性来解决BGP路由的各种问题的时候,无一例外都要用到路由策略,而路由策略很多都是基于前缀来进行处理的。当需要处理路由特别多的时候,我们的配置和维护工作量就会大幅度增加,在大型网络中,这种配置和维护的成本是难以接受的。所以我们可以对需要做同一策略的路由标识一个相同的团队属性,这样就可以基于团队属性来对路由实施策略了。

团体属性的应用举例

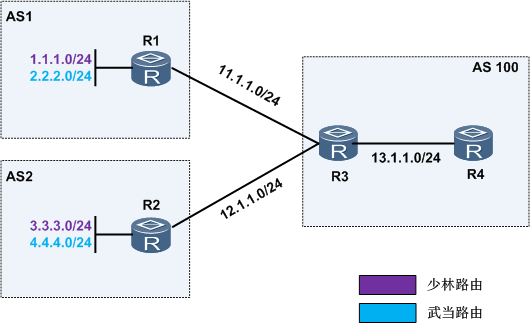
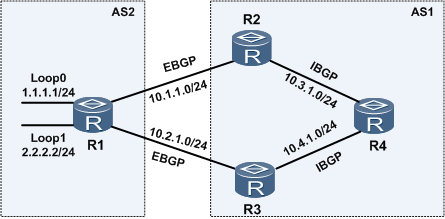
 这里我们要求R3发给R4的少林路由均打上LP属性值100,而发给R4的武当路由均打上LP属性值200。如何通过通过团队属性来实现这个目的呢?

一般的做法是,我们先要求R1通过路由策略,将发给R3的少林路由打上团队属性100:1。而发给R3的武当路由打上团队属性200:1。

注意:团队属性的团体号取值有两种形式:

1:整数形式,取值范围是0~4294967295

2:AA:NN形式,AA和NN的取值范围均为0~65535

我们要求R2也同样在将路由发给R3时打上团队属性。这样,我们在R3上就可以通过路由策略,将携带团队属性100:1的路由打上LP属性值100,将携带团队属性200:1的路由打上LP属性值200,这样配置和管理的工作量就小了很多。

R1的关键配置:

#

bgp 1

 peer 11.1.1.2 as-number 100

 #

 ipv4-family unicast

  undo synchronization

  network 1.1.1.0 255.255.255.0

  network 2.2.2.0 255.255.255.0

  peer 11.1.1.2 enable

  peer 11.1.1.2 route-policy R1 export  /对R3出方向使用路由策略R1

  peer 11.1.1.2 advertise-community  /注意这个必配,对R3发送路由时携带团队属性,缺省情况下,BGP不将团队属性发送给任何对等体。

#

route-policy R1 permit node 5  /配置路由策略,所有匹配前缀列表shaolin的路由打上团队属性100:1

 if-match ip-prefix shaolin

 apply community 100:1

#

route-policy R1 permit node 10  /配置路由策略,所有匹配前缀列表wudang的路由打上团队属性200:1

 if-match ip-prefix wudang

 apply community 200:1

#

ip ip-prefix shaolin index 10 permit 1.1.1.0 24  /前缀列表shaolin匹配前缀1.1.1.0/24

ip ip-prefix wudang index 10 permit 2.2.2.0 24  /前缀列表wudang匹配前缀1.1.1.0/24

R2的关键配置:

#

bgp 2

 peer 12.1.1.2 as-number 100

 #

 ipv4-family unicast

  undo synchronization

  network 3.3.3.0 255.255.255.0

  network 4.4.4.0 255.255.255.0

  peer 12.1.1.2 enable

  peer 12.1.1.2 route-policy R2 export

  peer 12.1.1.2 advertise-community

#

route-policy R2 permit node 5

 if-match ip-prefix shaolin

 apply community 100:1

#

route-policy R2 permit node 10

 if-match ip-prefix wudang

 apply community 200:1

#

ip ip-prefix shaolin index 10 permit 3.3.3.0 24

ip ip-prefix wudang index 10 permit 4.4.4.0 24

#

R3的关键配置:

#

bgp 100

 peer 11.1.1.1 as-number 1

 peer 12.1.1.1 as-number 2

 peer 13.1.1.2 as-number 100

 #

 ipv4-family unicast

  undo synchronization

  peer 11.1.1.1 enable

  peer 12.1.1.1 enable

  peer 13.1.1.2 enable

  peer 13.1.1.2 route-policy R3 export  /对R3出方向实施路由策略R3

  peer 13.1.1.2 next-hop-local  /这条必配,否则R3上BGP路由不生效

#

route-policy R3 permit node 5  /配置路由策略R3,所有匹配团队属性过滤器1的路由打上LP属性值100

 if-match community-filter 1

 apply local-preference 100

#

route-policy R3 permit node 10  /配置路由策略R3,所有匹配团队属性过滤器2的路由打上LP属性值200

 if-match community-filter 2

 apply local-preference 200

#

ip community-filter 1 permit 100:1  /配置团队属性过滤器1,允许团体属性100:1

ip community-filter 2 permit 200:1  /配置团队属性过滤器2,允许团体属性200:1

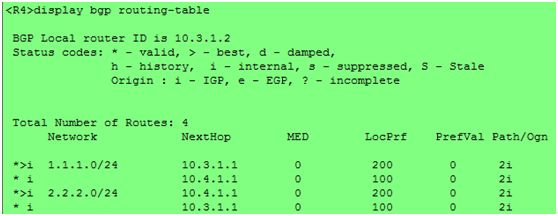
配置完成后,我们在R3上通过命令display bgp routing-table community 100:1和命令display bgp routing-table community 200:1查看团队属性100:1和200:1对应的BGP路由。

除了可以为路由配置团队属性值外,还能指定路由属于一些众所周知(Well-known)的团队。

其它的团体属性

下面我们简单介绍一下几种众所周知的团队属性::

1:Internet:设备收到携带该团队属性的路由可以将之发送给任何对等体,缺省情况下任何路由都属于该团体。

2:No_Advertise:设备收到携带该团队属性的路由后,不向任何对等体发送该路由。

3:No_Export:设备收到携带该团队属性的路由后,不向AS外(EBGP对等体)发送该路由。

4:No_Export_Subconfed:设备收到携带该团队属性的路由后,只能在AS内传递,并且如果配置BGP联盟,不向其他子AS发送该路由。

下面以No_Export说明一下,其他周知团队属性类似。

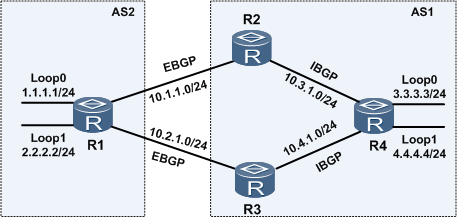
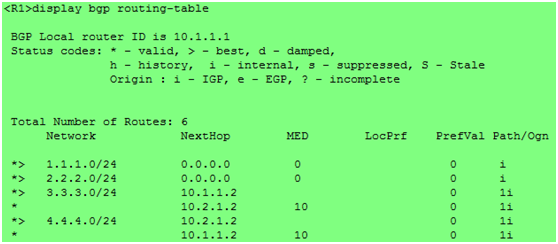
假设上例中,AS1不希望AS2能够访问本AS中的少林网段和武当网段,这时就可以利用No_Export来实现。先看一下R2的BGP路由表:

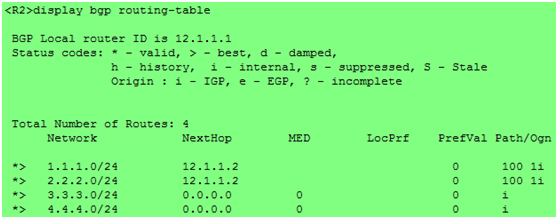
这时,R2上是有AS1的路由的。我们在R1上修改如下配置:

#

route-policy R1 permit node 5 

 if-match ip-prefix shaolin

 apply community 100:1 no-export

#

route-policy R1 permit node 10

 if-match ip-prefix wudang

 apply community 200:1 no-export
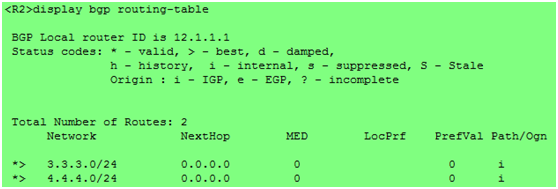
#

R2上已经没有AS1的路由。

BGP 属性介绍及应用场景

属性介绍

  • 1. 优选协议首选值(PrefVal)最高的路由,是华为私有的属性
  • 2. 优选本地优先级(LP)最高的路由。
  • 3. 优选起源于本地的路由。
  • 4.优选携带AIGP属性的路由。
  • 5. 优选AS路径(AS_PATH)最短的路由。
  • 6.依次优选Origin类型为IGP、EGP、Incomplete的路由。
  • 7. 优选MED值最小的路由。
  • 8. 依次优选EBGP路由、IBGP路由、LocalCross路由、RemoeCross路由。
  • 9. 优选到BGP下一跳IGP度量值(Metric)最小的路由。
  • 10. 优选Cluster_List最短的路由。
  • 11.优选Router ID最小的设备发布的路由。
  • 12. 优选从具有最小IP地址的对等体学来的路由。

PrefVal 数值越大,路由越优,缺省情况下所有路由的协议首选值(PrefVal)均为0.

Network BGP 属性 Local_Praf、Mulit_Exit_Disc

LOCAL_PRAF属性(以下简称LP)和MULTI_EXIT_DISC属性(以下简称MED)

查看BGP 路由表

LP属性被用于在去往同一目的地的多条路由中设置路由优先级,从名字就可以看出,LP属性只是应用于本地对等体之间,即,只能在IBGP对等体之间传递,不会应用于EBGP对等体之间。LP属性常用于AS出口出方向流量的路径控制,LP属性值越大,路由越优。

通常情况下,MED属性的作用是在去往邻居AS存在多条链路时,允许AS为入站流量传达其优先级。(一般来说,比较不同AS的MED属性没有太大意义,特殊场景除外。)从MED属性的作用可以看出,MED属性只是作用于EBGP对等体,而IBGP对等体互相通告路由时,会忽略MED属性。MED属性常用于AS出口入方向流量的路径控制,MED属性值越小,路由越优。

以下是华为专题的例子说明

这里要求R4去往1.1.1.0/24 走 R2、去往2.2.2.0/24 走R3

R2的配置

bgp 1

 peer 10.1.1.1 as-number 2

 peer 10.3.1.2 as-number 1

 #

 ipv4-family unicast

  undo synchronization

  peer 10.1.1.1 enable

  peer 10.3.1.2 enable

  peer 10.3.1.2 route-policy LP export  /对R4出方向使用路由策略LP

  peer 10.3.1.2 next-hop-local

#

route-policy LP permit node 5  /设置路由策略LP,如果匹配前缀LP,则LP置为200

 if-match ip-prefix LP

 apply local-preference 200

#

route-policy LP permit node 10

#

ip ip-prefix LP index 10 permit 1.1.1.0 24  /配置前缀列表LP,匹配1.1.1.0/24

#

R3的配置

bgp 1

 peer 10.2.1.1 as-number 2

 peer 10.4.1.2 as-number 1

 #

 ipv4-family unicast

  undo synchronization

  peer 10.2.1.1 enable

  peer 10.4.1.2 enable

  peer 10.4.1.2 route-policy LP export  /对R4出方向使用路由策略LP

  peer 10.4.1.2 next-hop-local

#

route-policy LP permit node 5  /设置路由策略LP,如果匹配前缀LP,则LP置为200

 if-match ip-prefix LP

 apply local-preference 200

#

route-policy LP permit node 10

#

ip ip-prefix LP index 10 permit 2.2.2.0 24  /配置前缀列表LP,匹配2.2.2.0/24

#

可以看到,在R4上,去到1.1.1.0/24网段有两条路由,但是下一跳为R2的路由的LP属性为200,而下一跳为R3的路由的LP属性为100,所以优选R2进行转发。去到2.2.2.0/24网段的路由同理。

我们对上面的例子稍作修改,在R4上也发布两条路由3.3.3.0/24和4.4.4.0/24。如图:

R2新增配置:

#

bgp 1

#

 ipv4-family unicast 

  peer 10.1.1.1 route-policy MED export  /对R1出方向使用路由策略MED

#

route-policy MED permit node 5 /设置路由策略MED,如匹配前缀MED,则MED置为10

 if-match ip-prefix MED

 apply cost 10

#

route-policy MED permit node 10

#

ip ip-prefix MED index 10 permit 4.4.4.0 24 /配置前缀列表MED,匹配4.4.4.0/24

#

R3新增配置:

bgp 1

 #

 ipv4-family unicast

  peer 10.2.1.1 route-policy MED export  /对R1出方向使用路由策略MED

#

route-policy MED permit node 5 /设置路由策略MED,如匹配前缀MED,则MED置为10

 if-match ip-prefix MED

 apply cost 10

#

route-policy MED permit node 10

#

ip ip-prefix MED index 10 permit 3.3.3.0 24 /配置前缀列表MED,匹配3.3.3.0/24

#

可以看到去往3.3.3.0/24目的地有两条路由,下一跳为R2的路由被优选,因为其MED值较小。4.4.4.0/24的路由同理。

powershell 添加用户环境变量

https://www.pdq.com/blog/categories/powershell/1

https://www.tenforums.com/tutorials/121664-set-new-user-system-environment-variables-windows.html

Set New User Environment Variables in Command Prompt

1 Open a command prompt.

2 Type the command below into the command prompt, and press Enter. (see screenshot below)

setx [variable name] "[variable value]"

Substitute [variable name] in the command above with the actual variable name (ex: “Downloads”) you want to use.

Substitute [variable value] in the command above with the actual variable value (ex: “C:\Users\Brink\Downloads”) you want to use.

3 You can now close the command prompt if you like.

Set New User Environment Variables in PowerShell

1 Open Windows PowerShell.

2 Type the command below into PowerShell, and press Enter. (see screenshot below)

[Environment]::SetEnvironmentVariable("[variable name]","[variable value]","User")

Substitute [variable name] in the command above with the actual variable name (ex: “Downloads”) you want to use.

Substitute [variable value] in the command above with the actual variable value (ex: “C:\Users\Brink\Downloads”) you want to use.

3 You can now close Windows PowerShell if you like.

Set New System Environment Variables in Command Prompt

You must be signed in as an administrator to do this option.

1 Open an elevated command prompt.

2 Type the command below into the elevated command prompt, and press Enter. (see screenshot below)

setx [variable name] "[variable value]" -M

Substitute [variable name] in the command above with the actual variable name (ex: “Downloads”) you want to use.

Substitute [variable value] in the command above with the actual variable value (ex: “%UserProfile%\Downloads”) you want to use.

3 You can now close the elevated command prompt if you like.

Set New System Environment Variables in PowerShell

You must be signed in as an administrator to do this option.

1 Open an elevated Windows PowerShell.

2 Type the command below into the elevated PowerShell, and press Enter. (see screenshot below)

[Environment]::SetEnvironmentVariable("[variable name]","[variable value]","Machine")

Substitute [variable name] in the command above with the actual variable name (ex: “Downloads”) you want to use.

Substitute [variable value] in the command above with the actual variable value (ex: “%UserProfile%\Downloads”) you want to use.

3 You can now close the elevated Windows PowerShell if you like.